Web acoustic simulator
for real venues.
From an idea to a finished report in minutes — and you actually enjoy the process. It feels light, yet hides serious scientific power underneath.
/help-assets/00-welcome.pngFast Venue is a concept
From the idea to the final report in minutes — enjoying the process along the way.
Most acoustic tools make you fight the software before you ever see a result. Fast Venue flips that. It feels light and immediate: you load or draw a venue, drop speakers and audience areas, press one button, and the sound pressure level paints itself across every seat.
But that lightness is a surface. Underneath sits real science — per-speaker polar data, distance attenuation, phasor and power summation across frequency bands (1/3 oct, octave, dBA, dBZ), shadow zones, and mic-based frequency response. The simple button and the rigorous math are the same tool.
/help-assets/01-power.pngStart with an idea
A room, a stage, a stadium — real or imagined.
Place & tune
Speakers, audiences, mics — drag, gain, delay, mute, solo.
Deliver
Export a clean PDF report or a CAD file — minutes, not hours.
The promise: light to use, heavy under the hood. You should feel like you're sketching, while the engine computes like a lab.
Create your venue
Generate your own parametric venues, or draw any shape you need — even on top of a live satellite view.
/help-assets/02-starting-points.pngVenue Creator — parametric venues
Don't have a CAD model? Generate one. Venue Creator builds 3D venues from parameters — arenas, amphitheaters, halls, rooms — that drop straight into the acoustic engine. Pick a shape, tune the numbers, send it to Fast Venue.
/help-assets/02-venue-creator.pngShape Drawer — draw anything
Need a custom footprint? Shape Drawer lets you draw any kind of shape: rectangles, trapezoids, circles, ellipses, polygons, semicircles, tubes — then extrude them into 3D. Each shape can become geometry or an audience area directly.
/help-assets/02-shape-drawer.pngDirect integration with world maps
Designing for a real outdoor site? Shape Drawer has direct integration with world maps — so you can pull satellite captures right inside the app. Search the location, switch to Street or Satellite, capture the view, and draw your audience footprint to real-world scale on top of the imagery.
/help-assets/02-shape-drawer-satellite.pngGenerated and drawn venues land in the scene exactly like imported CAD — every downstream tool (heat map, reports, export) works the same way.
Concept → report, in minutes
This is what Fast Venue is built for: get from the first idea to a finished technical report fast — in minutes, not days.
Everything you do — building the venue, placing speakers, painting the heat map — flows toward a deliverable. Work on the left, watch your report take shape on the right, and export when you're happy.
/help-assets/02b-concept-to-report.pngQuick start: cover a venue in audience areas — automatically
Import a model in any supported format, then cover it in audience areas in seconds. What used to be tedious is now a click.
Manually trace every seating block by hand, one rectangle at a time, hoping you matched the architect's surfaces. Slow, error-prone, soul-draining.
Import the model and let Fast Venue detect the surfaces — or simply paint the entire imported geometry as one audience. Seconds, not an afternoon.
First, choose how to start
From the Welcome screen you pick your entry point. To follow a real project from an external drawing, start with Build and then Import geometry.
Import a geometry from an external file
Bring in your model from any supported format — just import and Fast Venue figures out the type. We cover the industry standards like OBJ and DXF, plus 3D formats (glTF, GLB, Collada), images, CLF speaker models and full projects.
/help-assets/03-accepted-formats.pngOur own updated SketchUp plugin
On top of the standards, Fast Venue ships its own updated SketchUp
plugin — the Danley Direct Plugin — so you can export,
import and preview your SketchUp work directly through the
.danleyskp pipeline.
/help-assets/03-danley-plugin.pngThen cover it — automatically
Right after importing, Fast Venue asks how to turn that geometry into a simulation surface. There is no single rigid workflow — pick what fits the model:
/help-assets/03-importing.pngEach mode highlights a different set of surfaces, so you cover exactly what matters — compare:
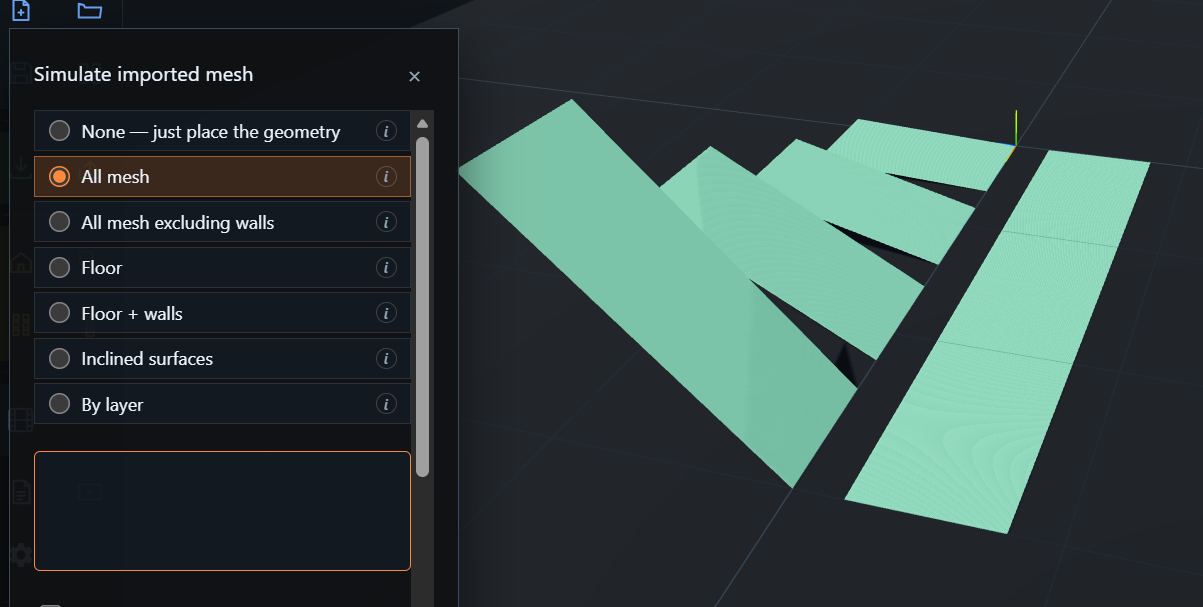
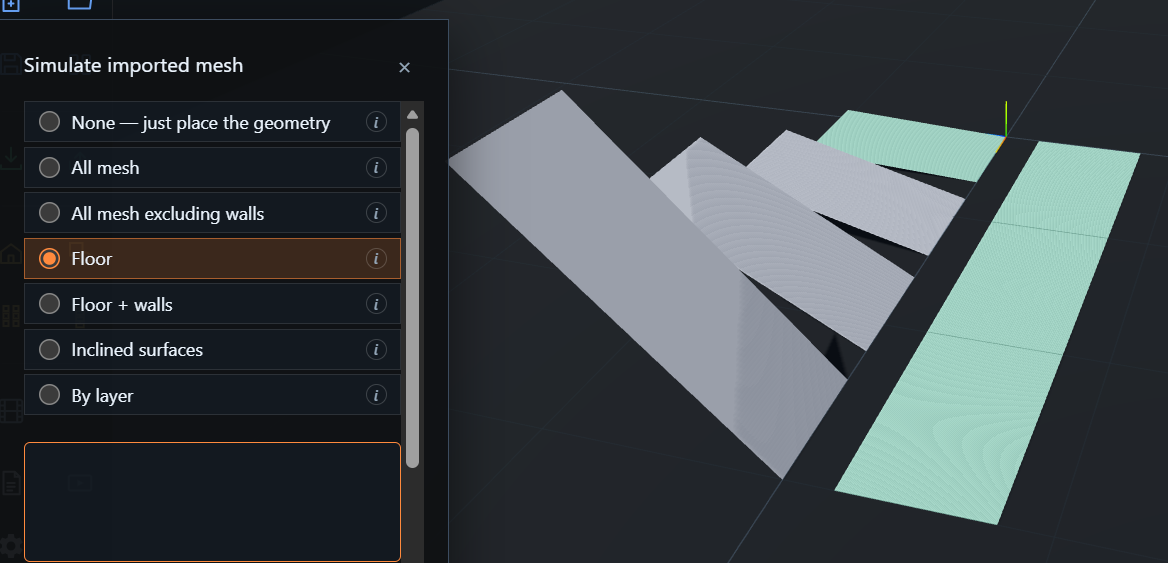
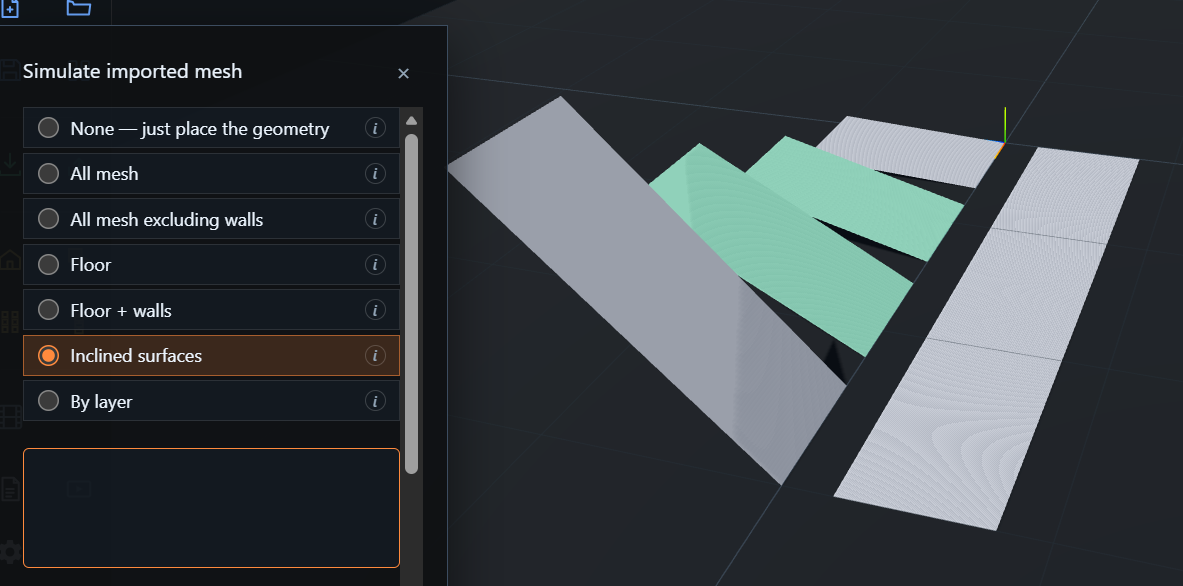
(By layer is also available — pick the CAD layers that represent seating and ignore the rest.)
Automatic audience-surface detection — the Fast Venue way
Fast Venue offers automatic detection of audience surfaces, cutting out the slow manual work. Choose a mode and the matching surfaces are recognized and turned into audience areas in one step.
/help-assets/03-detected.pngThe proof: drop a speaker
Place a single speaker and the SPL heat map paints across the audience areas that were detected — confirming the surfaces were picked up correctly. What used to take many minutes of hand-tracing is already done.
/help-assets/03-result.pngExport, too — Fast Venue is also a converter
Just as you can import many geometries, you can also
export several — which turns Fast Venue into a
file-format converter in its own right. Bring a model in as one
format and send it out as another (OBJ, DXF, DAE/Collada, glTF, .danleyskp),
or grab a PNG/JPG capture. Fast Venue is super compatible.
/help-assets/03-export.pngDetecting stairs & bleachers
Tiered seating — bleachers, grandstands, raked stalls and stairs — is exactly what the Inclined surfaces mode is tuned for: Fast Venue picks out the sloped tiers by their angle and turns them into audience areas, so the heat map climbs the steps with the seats.
And when an imported drawing is just lines with no faces, the Detect surfaces tool rebuilds the surfaces from those lines — classifying them as floor, incline (bleachers) or wall — so even a bare CAD plan becomes simulatable seating.
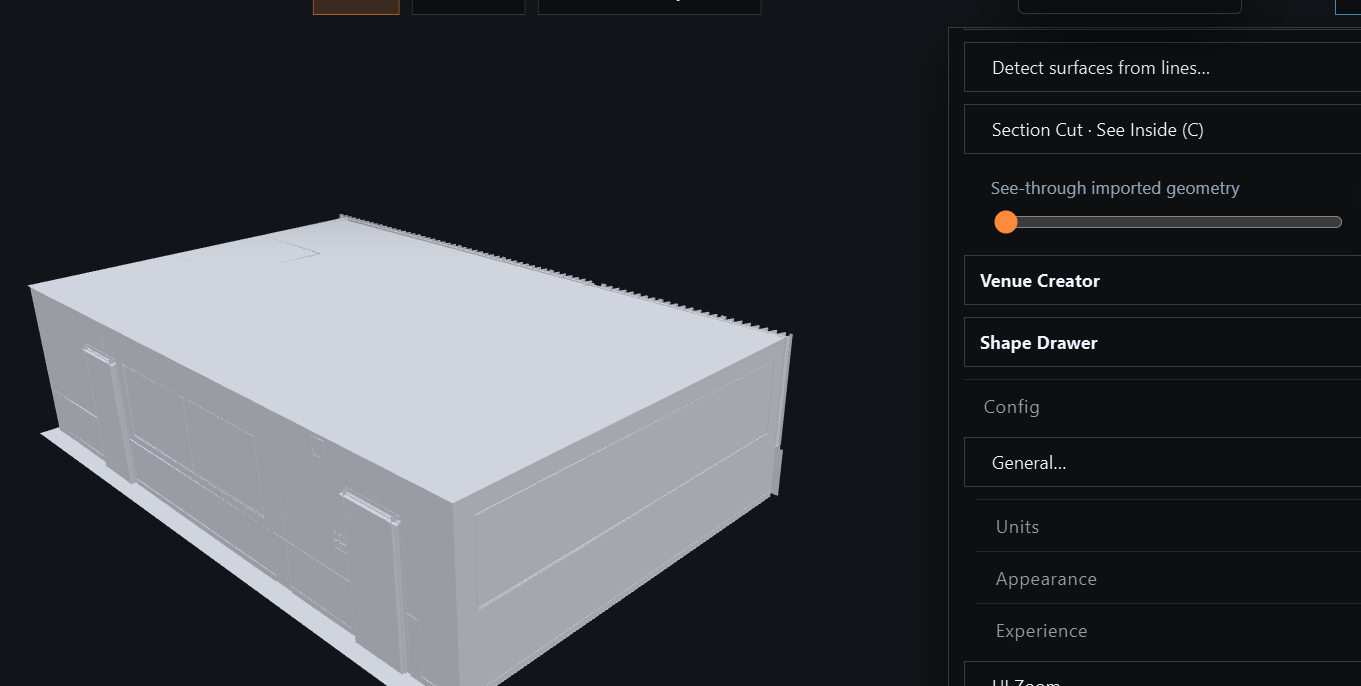
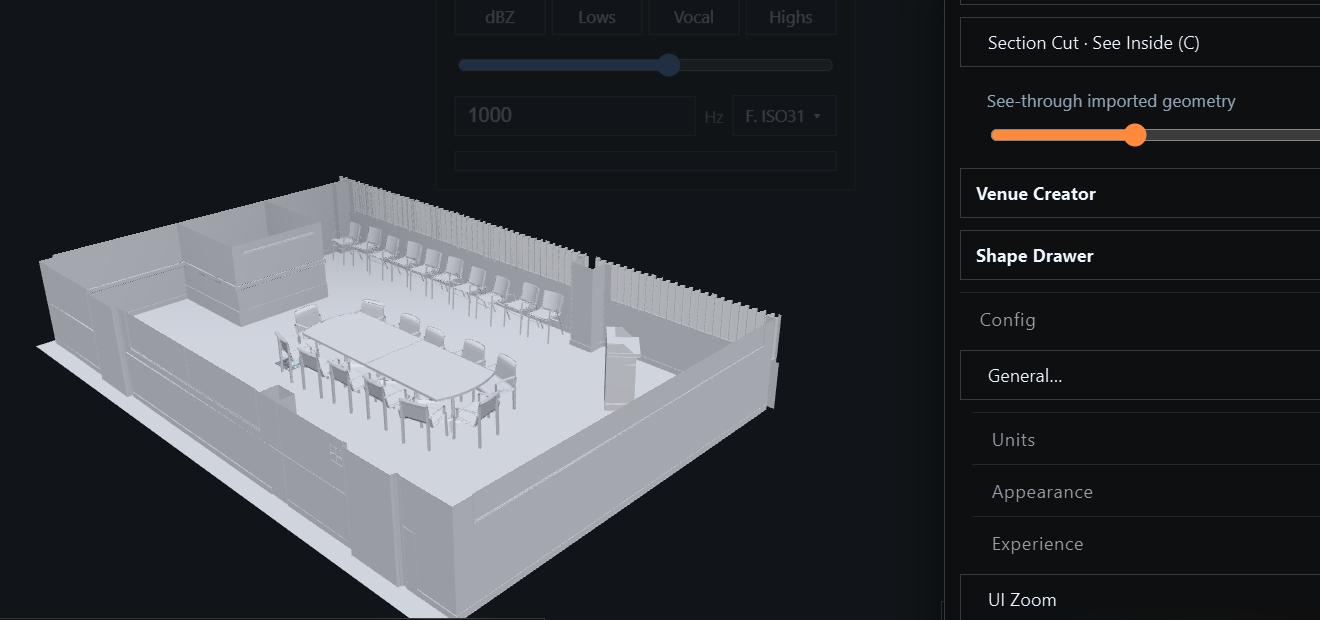
/help-assets/03-bleachers-detect.pngSee inside closed venues
When a venue is a closed box — a room, a hall, an arena with a roof — you can reveal the hidden geometry to look inside. Use Section Cut · See Inside (C) or drag the See-through imported geometry slider until the shell fades and the interior — seats, tables, the stage — comes into view.
Why it matters: covering a venue used to be the most tedious step. Making it instant is the difference between sketching ten options and committing to one.
Audience areas
Audience areas are the surfaces Fast Venue computes SPL on — the seating, the floor, the standing crowd. Auto-detect builds them for you; here's how to draw and shape them by hand.
/help-assets/04-audience-intro.pngDraw an audience in 3 clicks
From the Audiences menu choose Draw audience, then place three clicks. A live preview follows the cursor the whole time.
- Click 1 — front-left. The start of the front edge.
- Click 2 — front-right. Sets the front width and the direction the audience faces.
- Click 3 — back corner. Sets the depth, the back width and which side it extends to.
That's it — a full audience surface, ready to be covered by the heat map.
Shape it with 3D handles
Select an audience and a set of 3D gizmos appears so you can reshape it right in the scene — no dialogs required:
Front-mid (move)
The gold sphere on the front edge moves the whole audience rigidly.
Back-mid (length)
Drag the back sphere to change depth and rotation — the front stays anchored.
Width handles
The cyan spheres set the front and back width independently.
Incline arrow
The orange arrow rakes the surface — perfect for sloped seating.
/help-assets/05-audience-gizmos.pngIts properties panel
Right-click an audience to open its properties panel — every parameter in one place: position X / Y / Z, Color, Length, Width front and Width back, Rotation and Incline. The two buttons at the bottom — Redraw on map… and 3-Click on mesh… — re-run the drawing flow on the ground or snap it onto imported geometry.
/help-assets/04-audience-panel.pngQuick edit & redraw
- A green indicator floats over the nearest audience — click it to grab the handles without opening a panel.
- Right-click an audience to open its properties panel (name, position, width, length, incline, color).
- Redraw on map re-runs the 3-click flow to reshape an existing area.
- 3-Click on mesh snaps each click to the vertices of imported geometry — lay an audience straight onto a CAD model.
Read the result
Turn the simulation On and the SPL heat map paints across every audience area. Optional Audience SPL labels show the camera-facing average level at the center of each area.
/help-assets/05-audience-heat.pngThe pivot is the front. Rotation and incline pivot around the front-mid, so the front stays put while the back swings or rises — exactly how you think about aiming a raked seating block.
Microphones & Frequency Response
The heat map tells you how loud every seat is at one frequency. Microphones tell you the whole story at one seat — the full response across the spectrum, magnitude and phase.
What a microphone is
A microphone in Fast Venue is a virtual measurement probe. Drop it anywhere — a key seat, the mix position, the back row — and it samples the combined output of every active speaker at that exact point. Mics don't change the sound; they listen to it, the way a measurement mic would on site.
/help-assets/04-mics-closeup.pngPlacing & tuning mics
- Add mics from the Mics menu — Add microphone (some templates already include a few).
- Drag a mic to move it; each one carries a name, position and color.
- The color is how you tell its curve apart in the Frequency Response chart.
- Place several to compare seats — front vs back, on-axis vs off-axis, left vs right.
Right-click a mic to open its properties panel — set its exact position X / Y / Z and pick its Color (the color it uses in the Frequency Response chart).
/help-assets/04-mic-panel.pngThe Frequency Response panel
Open it with F, or right-click the viewport → Frequency Response. The panel plots, for every microphone, the response from 20 Hz to 20 kHz: a solid Magnitude curve (SPL in dB, left axis) and a dashed Phase curve (degrees, right axis). It's a floating, draggable panel — orbit and tweak the scene while it stays open.
/help-assets/04-fr-panel-full.pngWhat you can do here
Magnitude & Phase
Toggle the SPL magnitude and the phase traces independently.
Per-mic toggles
Show or hide each microphone's curve — compare just the ones you care about.
Color-matched
Every curve uses its microphone's color, so the chart maps back to the scene.
Send to PDF
Drop the chart straight into your report from the panel header.
Read it like a system tech: a flat, smooth magnitude across the band means even tonal balance; deep notches that move between mics point to comb filtering — arrivals from different speakers cancelling. Compare a front mic with a back mic to see how the system holds up across the room.
Mics read the same physics as the heat map (phasor or power summation), so the panel and the painted audience always agree. Switch Phase / Power in the top bar and watch both update together.
Dock the response to the bottom
Prefer it out of the way? Use the panel's dock button to pin the Frequency Response to the bottom of the visualization — a full-width readout running under the 3D scene. Keep working on the venue up top while the curves stay in view the whole time.
/help-assets/04-fr-docked.pngSpeakers
Speakers are the sources the whole simulation revolves around. Fast Venue gives you fast ways to place them and total control to aim and tune each one.
Place them fast
From the Speakers menu, pick the method that fits:
Add to floor
Drop a speaker on the ground to position by hand.
Add to vertex
Snap a speaker onto a vertex of imported geometry — rigging points, truss, walls.
Add to several audiences
Place sources aimed at a chosen set of audience areas at once.
Add to each audience
One speaker per audience area in a single step — a fast starting grid.
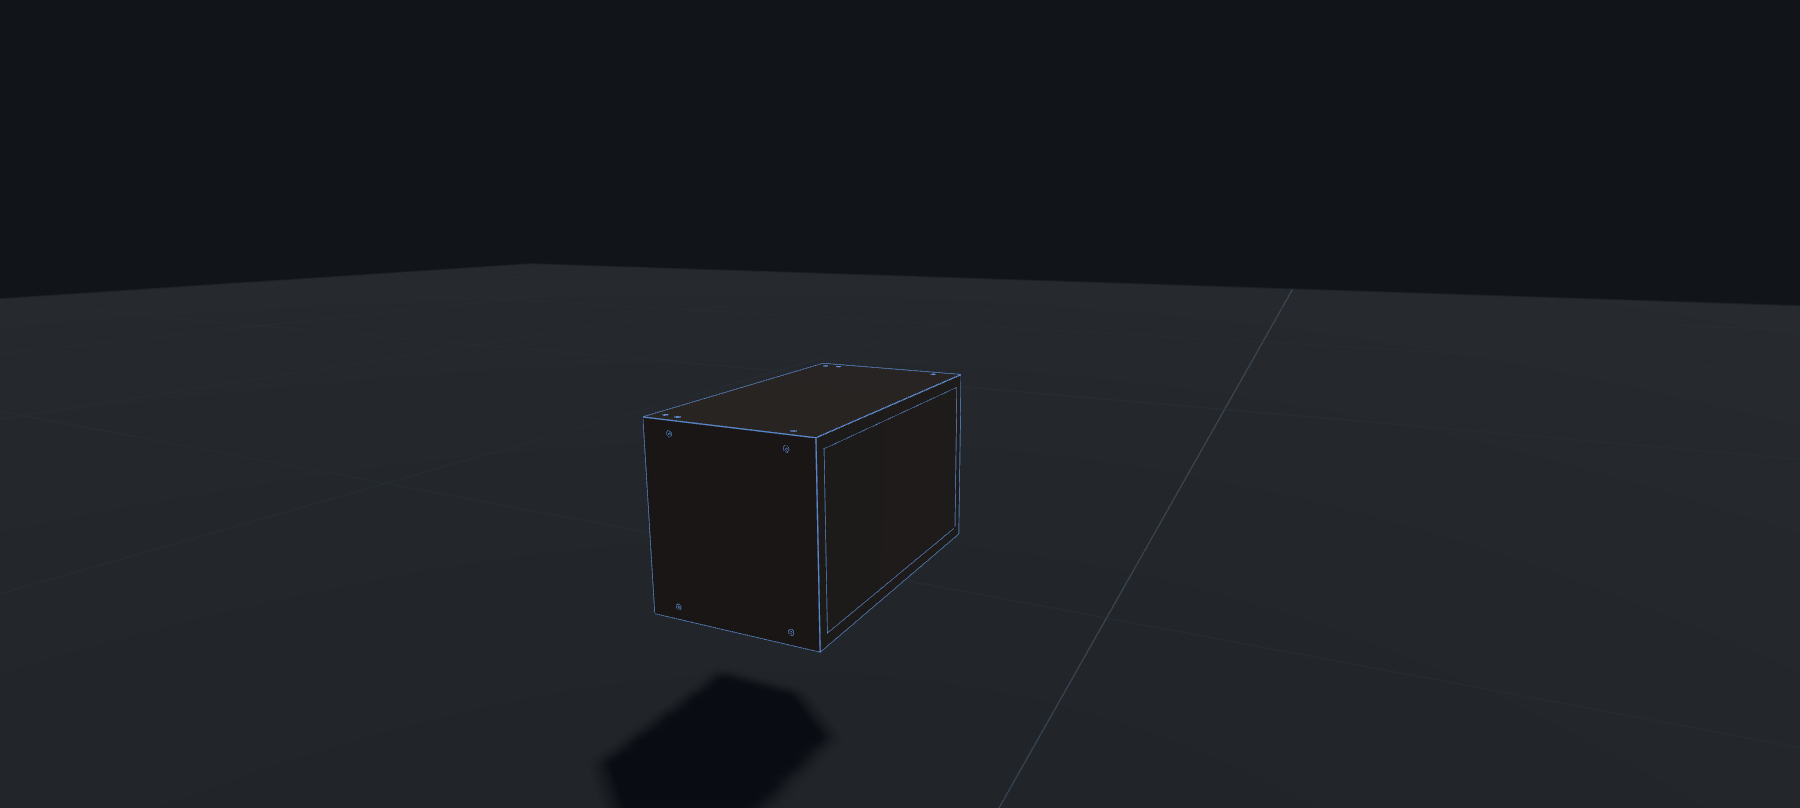
Choose how the box looks
In Config → General pick the speaker style. Cabinet (dark wood) renders solid Duratex-style boxes; Ray-X (semi-transparent pewter) lets you see the connector plate and what's behind; Wireframe is the lightest.
Total Control
Select a speaker to open Total Control — everything about that source in one panel: On / Inv / Solo / Mute, position X / Y / Z, aim Horiz / Incl / Spin, Gain and Delay, the Model, Layer and Color.
Move on its own axes
The most powerful part: nudge a speaker along its own local axes — Forward / Back, Sideways, Up / Down — instead of world X/Y/Z. The 3D arrows on the box show exactly which way it'll travel, so aiming a flown box feels physical.
/help-assets/spk-move-arrows.pngTwo camera shortcuts ride along: POV — view from behind (look out from the speaker toward the audience) and Locate — fly close (snap a far-away box to the foreground).
Aiming aids
- Laser rays (Z) — each active speaker fires a ray down its forward axis, truncating on the first audience it hits.
- Polar balloon (B) — the 3D directivity balloon of the selected speaker, so you see its real coverage shape.
Venue Creator
No CAD model? Generate one. Venue Creator builds complete 3D venues from a handful of parameters and sends them straight into the acoustic engine.
What it is
Venue Creator is a parametric venue generator — a dedicated tool with a deep library of venue types. Pick one, tune the numbers, and watch the 3D model rebuild live. When it looks right, send it to Fast Venue.
A library for almost every venue
There are dozens of ready-made venue types, so you rarely start from nothing:
Stadiums & arenas
Premier, round and bowl stadiums; football, baseball, rugby, cricket, hockey.
Performance & civic
Concert halls, auditoriums, theatres, cinemas, conference & exhibition halls, galleries, malls, plazas.
Worship
Churches of many traditions, cathedrals, chapels, temples, mosques and more.
Sport & events
Basketball, boxing/MMA, fencing, equestrian, golf, nightclubs, DJ stages.
/help-assets/02-venue-creator.pngHow to use it
- Open it. From the ✦ menu (or the Creation menu) choose Venue Creator. It opens as a full-screen tool over the app.
- Pick a venue type. Choose a template from the library that matches your project.
- Tune the parameters. Field size, bowl height, deck height, stand rake, rings, screens — drag the sliders and the model updates instantly.
- Send to Fast Venue. One button hands the geometry to the app.
It lands like any other model
The venue arrives as imported geometry — audience surfaces and structure on their own layers — so everything you already know applies: cover it with audience areas, drop speakers, press On, export a report. Same pipeline as imported CAD.
Venue Creator runs isolated in its own view and only ever hands Fast Venue a clean, serializable payload — it never touches the acoustic engine directly.
Iterate without fear: because the model is parametric, sweeping a slider regenerates the whole venue instantly — try three sizes, send the best one, and you've explored options in the time it used to take to draw one.
Shape Drawer
Draw any footprint you need — then turn it into an audience area or 3D geometry. Even trace it to scale on top of a live satellite view.
Draw any shape
Shape Drawer gives you a full set of primitives: rectangle, trapezoid, parallelogram, circle, ellipse, octagon, N-sided polygon, semicircle, tube and line. Draw on the ground plane with a live status line guiding each click.
/help-assets/02-shape-drawer.pngPrecise, forgiving tools
Snap
Snap to the grid or to existing vertices; hold Shift to draw freely.
Extrude
Push a flat shape up into a 3D solid with a drag handle.
Undo / redo
Step back and forward freely while you compose the layout.
Use as audience
Flag any shape to arrive as an audience area instead of plain geometry.
Compose several shapes
Build a layout from many pieces. Each committed shape is kept so you can select and edit it individually later, and undo reaches across shapes — step back through the whole session, not just the current one. Switch between Select, Orbit and the drawing tools from the toolbar; Orbit hands the camera to free rotation, Select picks an existing shape to tweak.
Trace a plan image
Have an architect's plan as a picture? Drop it in as an image overlay and draw your audience footprint straight over it — handy when there's no CAD file, only a drawing.
Draw over satellite imagery
For real outdoor sites, Shape Drawer has direct world-map integration: search the location, switch between Street and Satellite, capture the view, and trace your footprint to real-world scale — right on top of the imagery.
/help-assets/02-shape-drawer-satellite.pngSend to Fast Venue
When the shape is ready, send it over. Marked as audience, it becomes an audience area ready for the heat map; otherwise it lands as geometry. Either way it enters the normal pipeline — cover, simulate, report.
Like Venue Creator, Shape Drawer is isolated and only hands Fast Venue a clean payload — an adapter turns it into a real audience area or mesh.
Fundamentals — finding your way around
Fast Venue has two ways in to everything: the left toolbar for the things you do constantly, and the main menu (☰) for the full, organized set of features. They complement each other.
The left toolbar — your quick rail
The vertical rail on the left is a quick-access shortcut bar. It doesn't replace the main menu — it lifts the most-used actions out of it so they're one click away while you work. Every button here also lives, in full context, inside the ☰ menu.
/help-assets/08-left-toolbar.pngWhat's on the rail
- Project — New · Open · Save · Project Viewer.
- Files — Import… · Export… (the same many-format pipeline from the Quick start).
- Build tools — Venue Creator · Shape Drawer · Sub Arrays · Cluster Studio.
- Output & help — Movies · PDF Report · Settings · Help & guide.
The main menu (☰) — everything, organized
The hamburger menu, top-right, holds the complete feature set grouped into clear sections — Project, Import, Export, Audiences, Speakers, Mics, Simulation, Tools, Geometries, Presets, Config. When something isn't on the rail, it's here. Think of the rail as the express lane and the ☰ as the full directory.
Left toolbar
Fast, fixed, the essentials — for the actions you repeat all day.
Main menu
Complete and organized — every tool, grouped by what it does.
Special menu
Presets, the BeautifulVenues library and subsystem launchers.
The ✦ special menu (left of the ☰) is worth exploring — it gathers first-class extras: the venue presets, the Example library, the subsystems (Sub Arrays, Crowd Designer, Cluster Studio, Mago), Walk the venue, the Volumetric Field and the Auto Movie Report.
Rule of thumb: reach for the left toolbar first — if it's not there, open the ☰ menu and find it by section. Both routes lead to the same place.
Project Manager
Create, save and reopen your work — and start from a ready-made venue instead of a blank stage.
New, Open, Save
- New — start a clean project (with a friendly confirm so you never lose work by accident).
- Open — load a saved
.fastvenueproject. - Save / Save As — write the whole project — speakers, audiences, mics, imported geometry, simulation settings — to a single
.fastvenuefile.
All four are on the left toolbar (New · Open · Save · Project Viewer) and in the Project section of the ☰ menu.
The Project Viewer
The Project Viewer is a full-screen home for your projects. A sidebar switches between sources — Recently opened, Example library 1 and Example library 2 — with a search box, plus New project and Import… in the toolbar. Every project shows as a card with a live mini-preview thumbnail.
/help-assets/09-example-library.pngStart from a ready-made venue
The Example library ships dozens of finished venues you can load with one click — real stadiums and rooms like the Mercedes-Benz, Azteca, Bryant-Denny and Estadio Santos projects. It's the fastest way to explore Fast Venue, or to kick off from a venue close to yours. Each card's color-coded thumbnail lets you recognize the layout at a glance.
A .fastvenue file captures the entire project as portable JSON plus a
thumbnail — share it, reopen it anywhere, and it comes back exactly as you left it.
Configuration
Make Fast Venue fit how you work — units, look, world size, and how much of the interface you see.
Everything here lives in the Config section of the ☰ menu.
Units
Switch between Meters and Feet. Every length field, the world size and the grid update at once. (Internally Fast Venue always works in meters — only what you read and type is converted, so nothing drifts.)
Appearance
Sky & Sun (K)
Cycle the lighting: off → dawn → day → golden → dusk → night.
Theme
Dark or Light — the whole UI and the 3D scene follow.
Grid floor
Show or hide the ground grid.
Section cut (C)
Hide everything above a height — see inside closed venues, with a level slider.
World size
Open General… to set the overall grid and floor size to match your venue — a stadium and a club don't need the same stage.
Experience level
Fast Venue can show as much or as little as you want. Pick the tier that fits:
Starter
Just the essentials — the cleanest way to learn.
Standard
The common tools for everyday work.
Advanced
Everything exposed — full control.
The tier actually hides menu items — sections like Export, Tools and Geometries appear only at Standard or Advanced. If you can't find a feature from this guide, raise your tier here.
UI Zoom
Scale the whole interface up or down with UI Zoom (shortcut V) — comfortable on a laptop or a big control-room display alike.
New here? Start in Starter with Dark theme and your preferred units — then move up to Advanced as the workflow becomes second nature.